How to run on the AWS DP HPC cluster using SLURM
This page describes how to run the rapthor prefect prototype on one or more nodes on the AWS DP HPC cluster using SLURM with the Prefect server running on the headnode.
If you want to run inside a container on your local machine instead, see the quickstart guide.
If you want to run on an interactive compute node instead using a local prefect server on the compute node (i.e. without having to set up the Prefect server on the headnode) see the instructions for running on an interactive node.
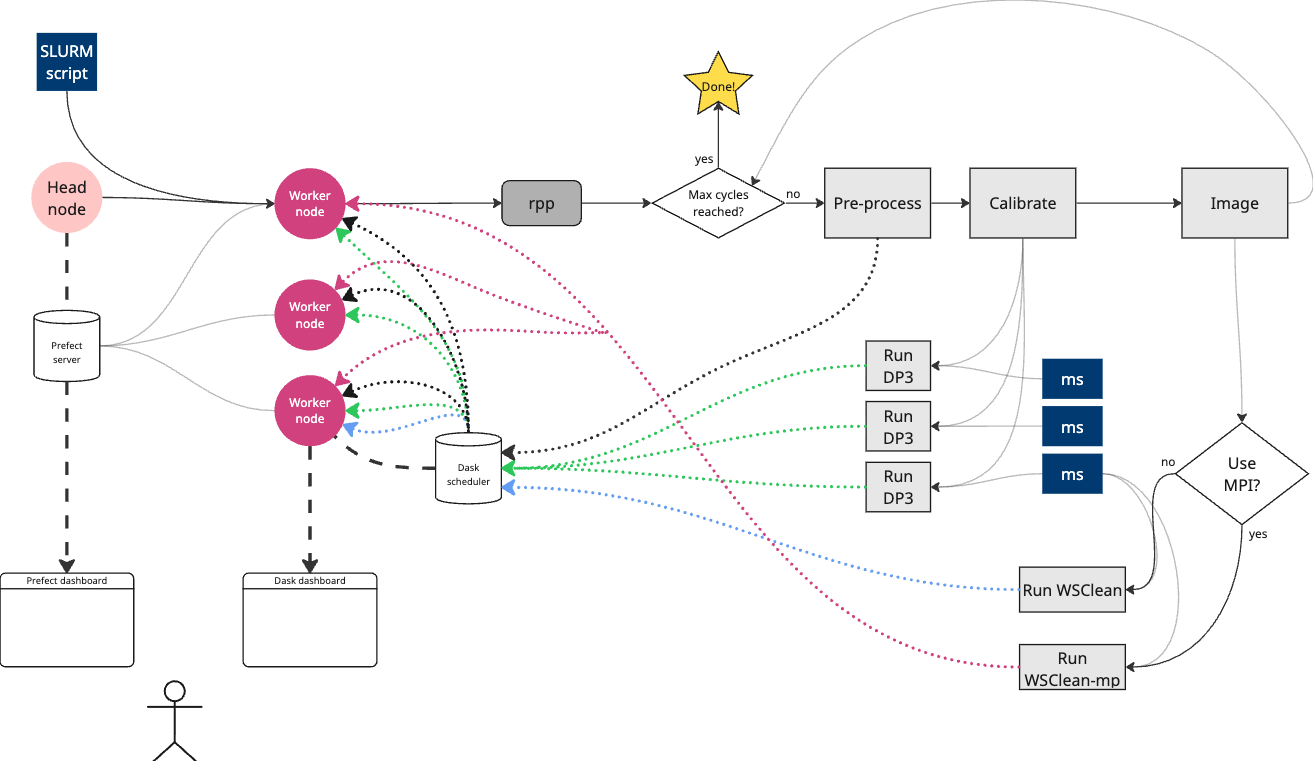
There are three main steps to running the rapthor prefect prototype on the AWS DP HPC cluster using SLURM (details for each step are provided below):
Set up a Prefect server on the headnode using the aws-prefect-start.sh script.
- Submit a SLURM job to run the code:
For a single node run you can modify the example (single node SLURM script).
For a multi-node run you can modify the example (multi-node SLURM script).
(Optional) Monitor the progress of the flow in the Prefect UI and Dask dashboard on your local machine (requires setting up an SSH tunnel).
The SLURM script will run the code in poc.py. Logs will be output to filepaths specified in the slurm script. These include:
slurm-<job_name>-<job_id>.out: standard output and error from the job (including output from DP3 and WSClean which are run by thepoc.pyscript)versions-<job_name>-<job_id>.txt: a list of versions of key software used in the job, including spack modules and python packagestunnel-<job_name>-<job_id>.txt: instructions for setting up SSH tunneling to access the Prefect UI and Dask dashboard on your local machinemonitor-<job_name>-<job_id>.log: benchmarking traces and plots for each node when running on multiple nodes.
The scripts have been tested on the AWS DP HPC cluster.
Prerequisites
An account on the AWS DP HPC cluster
This repository cloned to a directory on the AWS DP HPC cluster
Steps
#. Set up a Prefect server on the headnode
If there is already a Prefect server running on the headnode, you can skip this step.
Log into the DP HPC headnode.
Start a tmux session (using e.g.
tmux new -s prefect).Change to the root of project directory.
Run the aws-prefect-start.sh script:
./aws-prefect-start.shThis will start a Prefect server on the headnode which can be accessed from your local machine using an SSH tunnel (see instructions below).
If something else is using the default port (46200), you can specify a different port by exporting the
PREFECT_PORTenvironment variable before running the script, e.g.:export PREFECT_PORT=12345 ./aws-prefect-start.shThis will also run aws-setup-env.sh to set up the virtual python environment needed to run prefect, if this does not already exist.
A log file will be created
prefect-server-%Y%m%d-%H%M%S.logfor outputs and includes instructions for setting up SSH tunneling.Once the Prefect server is running, you can detach from the tmux session (using
CTRL-B D) and leave the server running in the background. If you kill the tmux session, the Prefect server will stop (repeat steps 1-4 to restart it).You can now access the Prefect UI on your local machine by setting up an SSH tunnel to the headnode (see instructions in the log file mentioned above).
#. Submit a SLURM job to run the proof of concept pipeline
Make sure the Prefect server is running on the headnode before submitting the SLURM job (step 1 above).
Log into the DP HPC headnode.
Change directory to the repository root folder, OR set the
REPO_DIRenvironmental variable to point to the project root, e.g.:export REPO_DIR=~/path/to/repo/ska-sdp-rapthor-prefect-prototype
If you changed the default port used by the Prefect server on the headnode, export the
PREFECT_PORTenvironment variable to the same value, e.g.:export PREFECT_PORT=12345
Decide how many nodes you want to use for the run. We have provided an example script for a single-node run and a multi-node run.
Edit the SLURM script sbatch file you want to use. You can change the paths or names of the log files and the SLURM job parameters if needed. Check that the
SPACK_TAGis set to the version you want to use. For the multi-node run you may also want to change the number of nodes.Note
The multi-node SLURM script will start a Dask scheduler on the first node using one CPU core and Dask workers on all nodes with
(cpus-per-task - 1)cores each. If you use the single-node SLURM script a local cluster will be started by the python script using all available cores on the node.Note
The multi-node SLURM script will run WSClean with MPI support by default. This will allow WSClean to perform parallel gridding using multiple MPI processes. Since we have not tuned the WSClean parameters for running with MPI, the performance may not be optimal. You can experiment with different WSClean parameters in the
poc.pyscript if you want to try to improve the performance. See the WSClean MPI documentation for more information. If you want to run WSClean on a single node you can edit the line that runs the poc.py script by removing the--use-mpioption. DP3 and Dask will still use all nodes.Submit the SLURM job using
sbatch, e.g.:sbatch aws-run-poc.sbatchor
sbatch aws-run-poc-multi-node.sbatchYou can check the status of the job using
squeueorsacct.Optional: monitor the job using the Prefect UI and Dask dashboard from your local machine. This will also show previous runs.
Once the job has started, copy the ssh tunnelling command from the
tunnel-<job_name>-<job_id>.txtfile created by the SLURM script.Open a terminal on your local machine
Start an aws session
Paste the command you copied from the log file, changing the username and hostname to whatever you normally use to access the headnode.
Open a web browser and go to
http://127.0.0.1:14200to access the Prefect UI andhttp://127.0.0.1:18787to access the Dask dashboard.Note
The Dask dashboard will only be available once the Dask cluster has been started by the flow (after the SLURM job has started running) and may have a different IP between runs, depending on which compute node is running the job.